MVC Crud Operation With Entity Framework
Step 1: Open the SQL Server and create a database table and related stored procedure.
/* Create Table Customer */

CREATE TABLE [dbo].[Customers](

	[CustomerId] [int] IDENTITY(1,1) NOT NULL,

	[FirstName] [nvarchar](250) NULL,

	[LastName] [nvarchar](250) NULL,

	[Phone] [nvarchar](20) NULL,

	[Email] [nvarchar](250) NULL,

	[Street] [nvarchar](250) NULL,

	[City] [nvarchar](250) NULL,

	[State] [nvarchar](250) NULL,

	[Zipcode] [nvarchar](10) NULL,

 CONSTRAINT [PK_Customers] PRIMARY KEY CLUSTERED

(

[CustomerId] ASC

)WITH (PAD_INDEX = OFF, STATISTICS_NORECOMPUTE = OFF, IGNORE_DUP_KEY = OFF, ALLOW_ROW_LOCKS = ON, ALLOW_PAGE_LOCKS = ON) ON [PRIMARY]

) ON [PRIMARY]
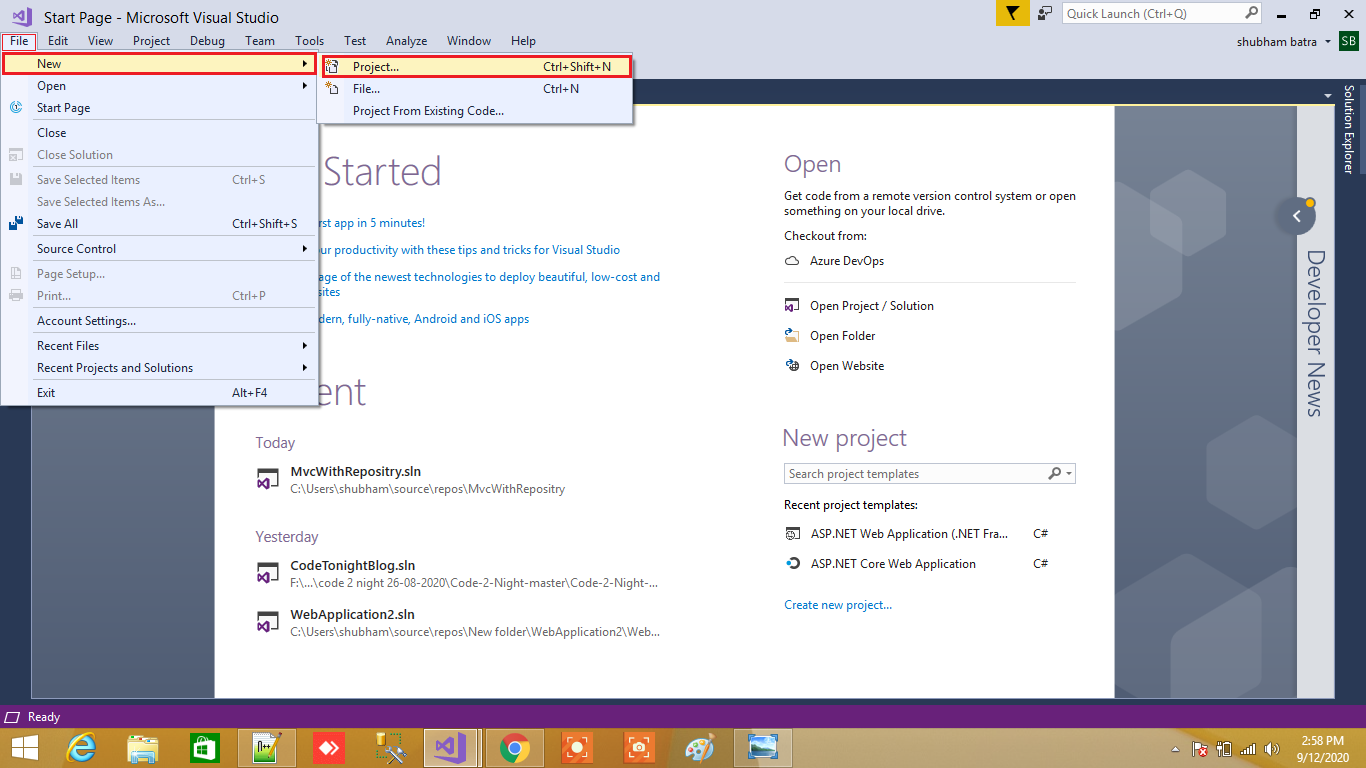
Step 2: Create a project
- Start Visual Studio 2017 or 2015.
- Create a new project -> Web -> Visual Studio 2017.
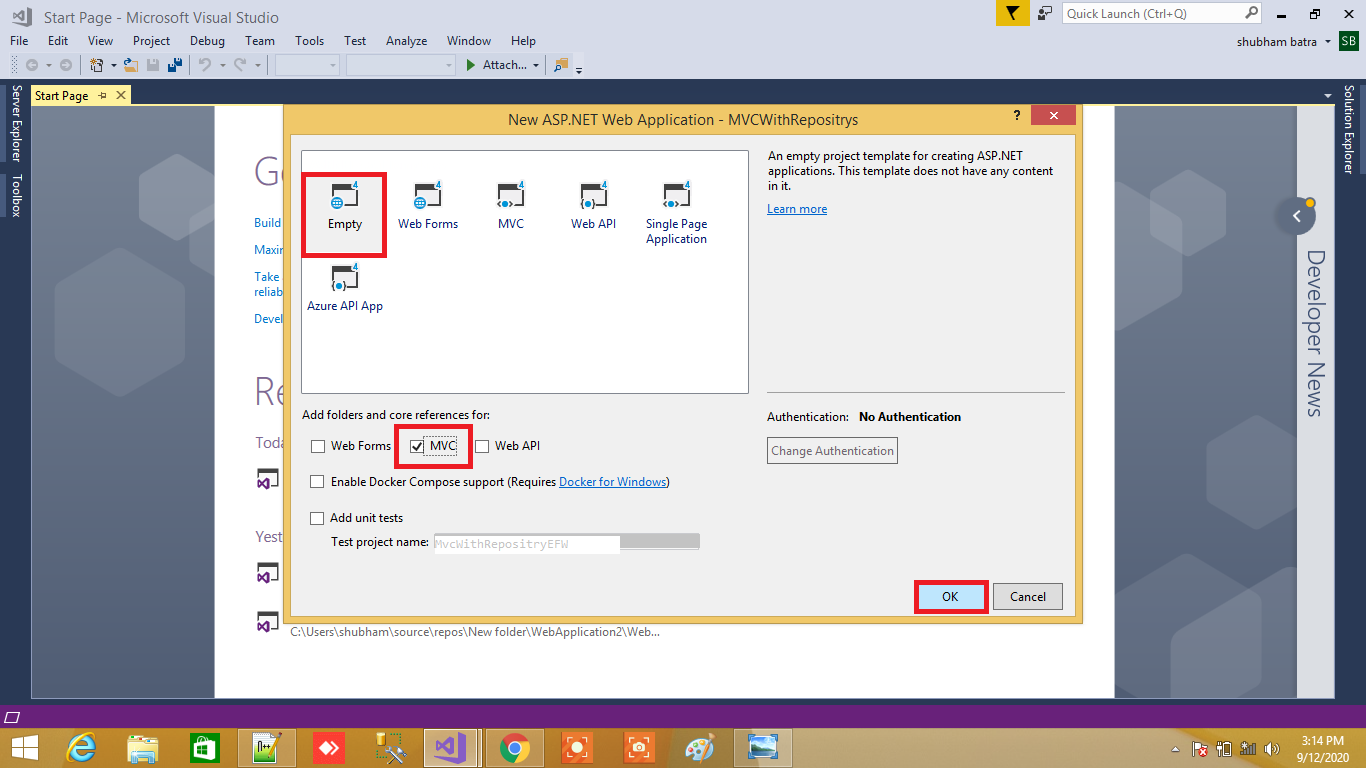
3. Select ASP.NET Web Application(.Net Framework).
4.Provide the Name and Location for the project and click Next.

5. Choose an "Empty" template and check "MVC" under "Add folders & core references" then click Ok.
Installing Entity framework
For adding Entity framework just right click on your application and from above list select “Manage NuGet Packages” After select a new dialog will popup of “Manage NuGet Packages” Inside search box enter “EntityFramework”. After getting search value select EntityFramework click on install button
After adding Entity framework now we are going to add ADO.NET Entity Data Model
Adding ADO.NET Entity Data Model
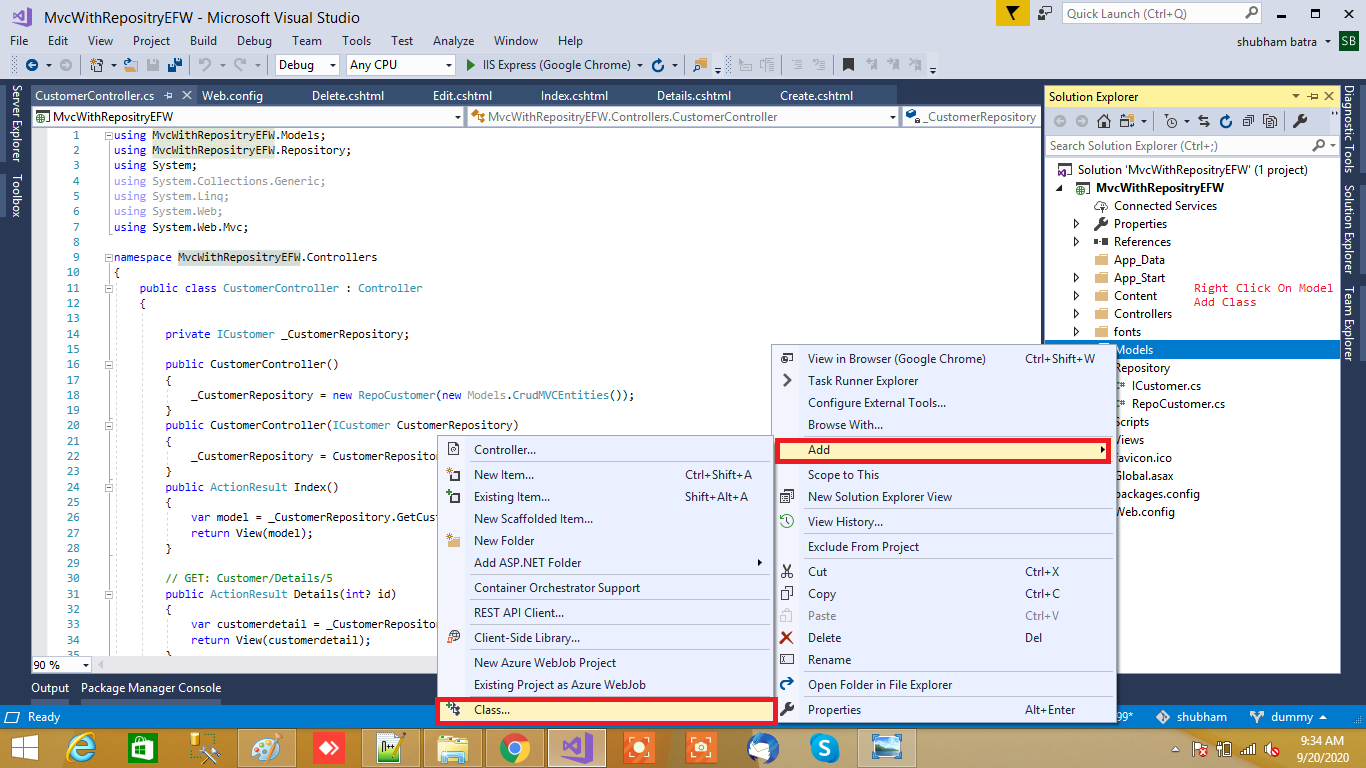
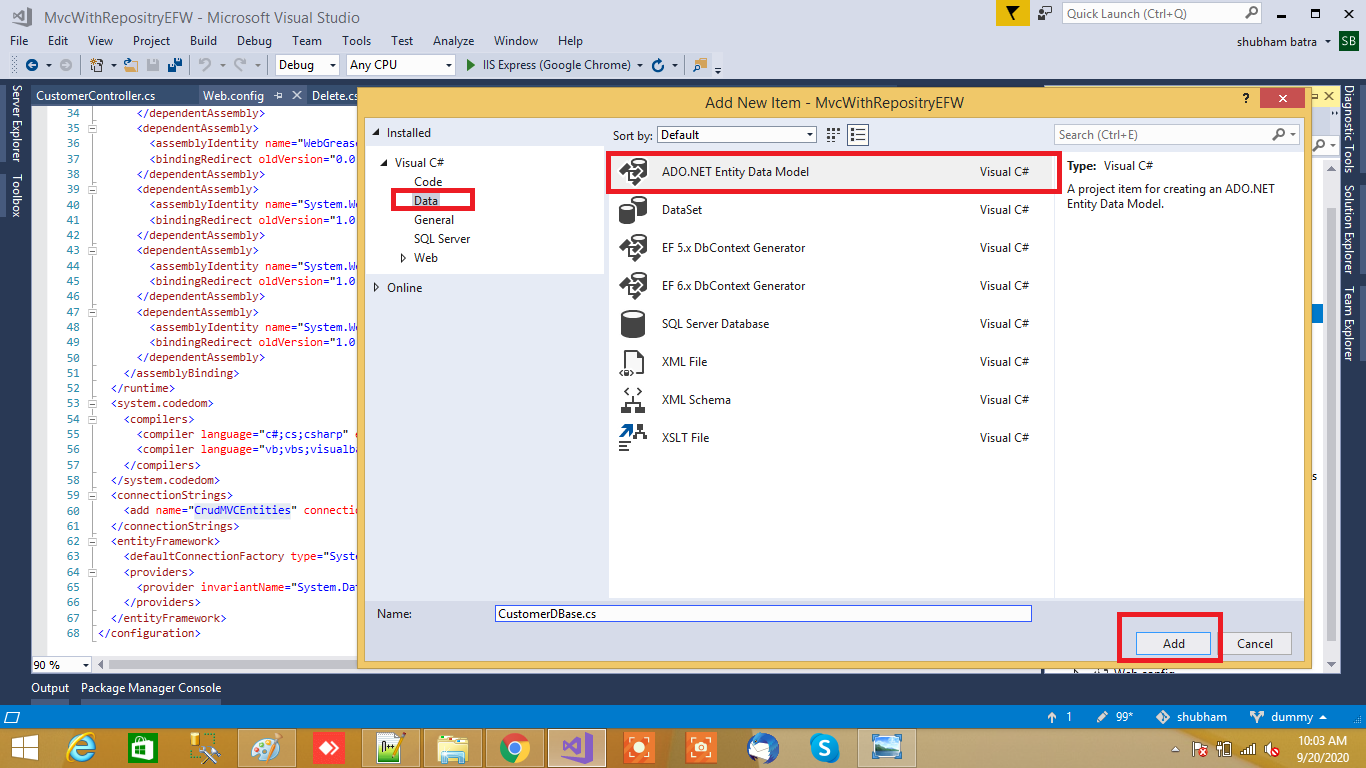
For ADO.NET Entity Data Model just right click on Model folder and select Add inside that Select ADO.NET Entity Data Model to our solution
After that a small dialog will popup for asking ADO.NET Entity Data Model Name I will name it as EmployeeDB
After that a new Wizard will popup where we are going configure EF Designer from database. In this we are going to use Database first.
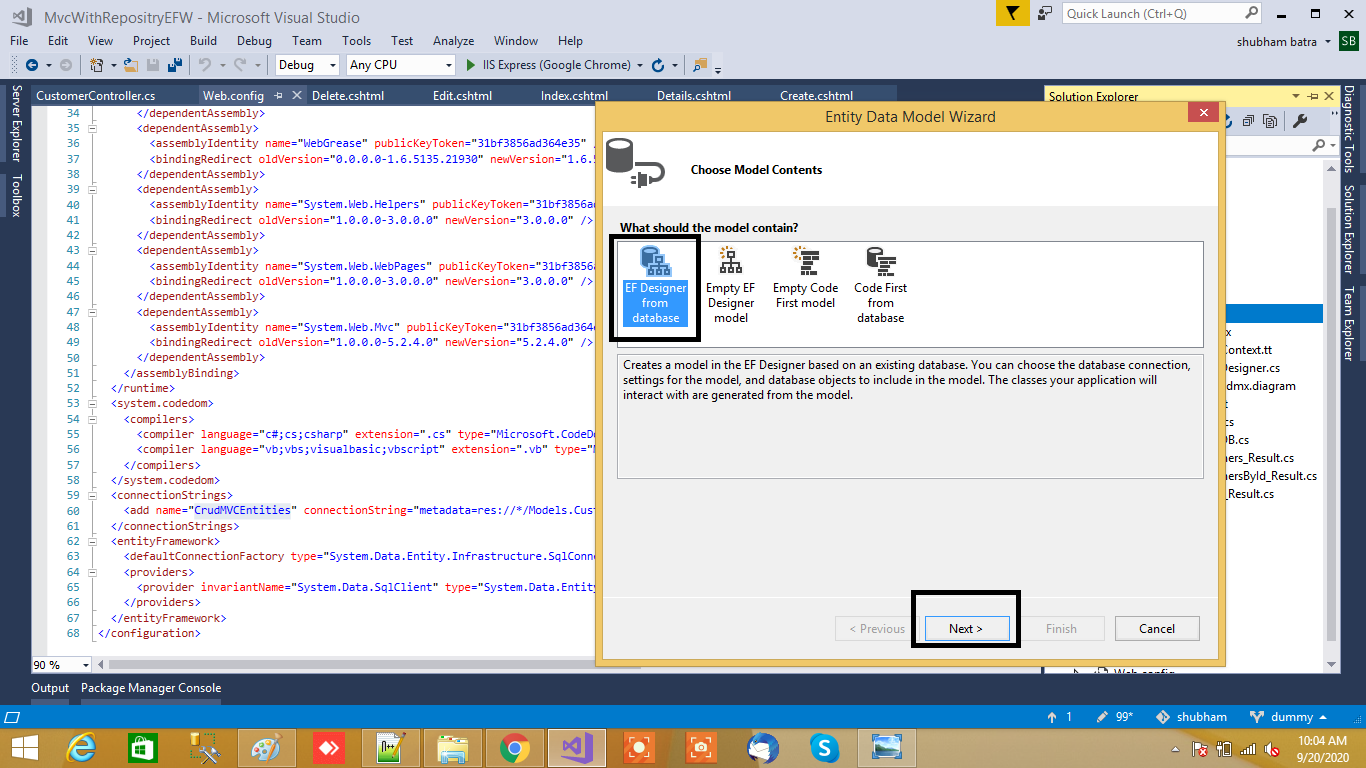
From that select Generate from database and click on Next button. After clicking on Next button a New Wizard will popup for Choosing Data Connection.
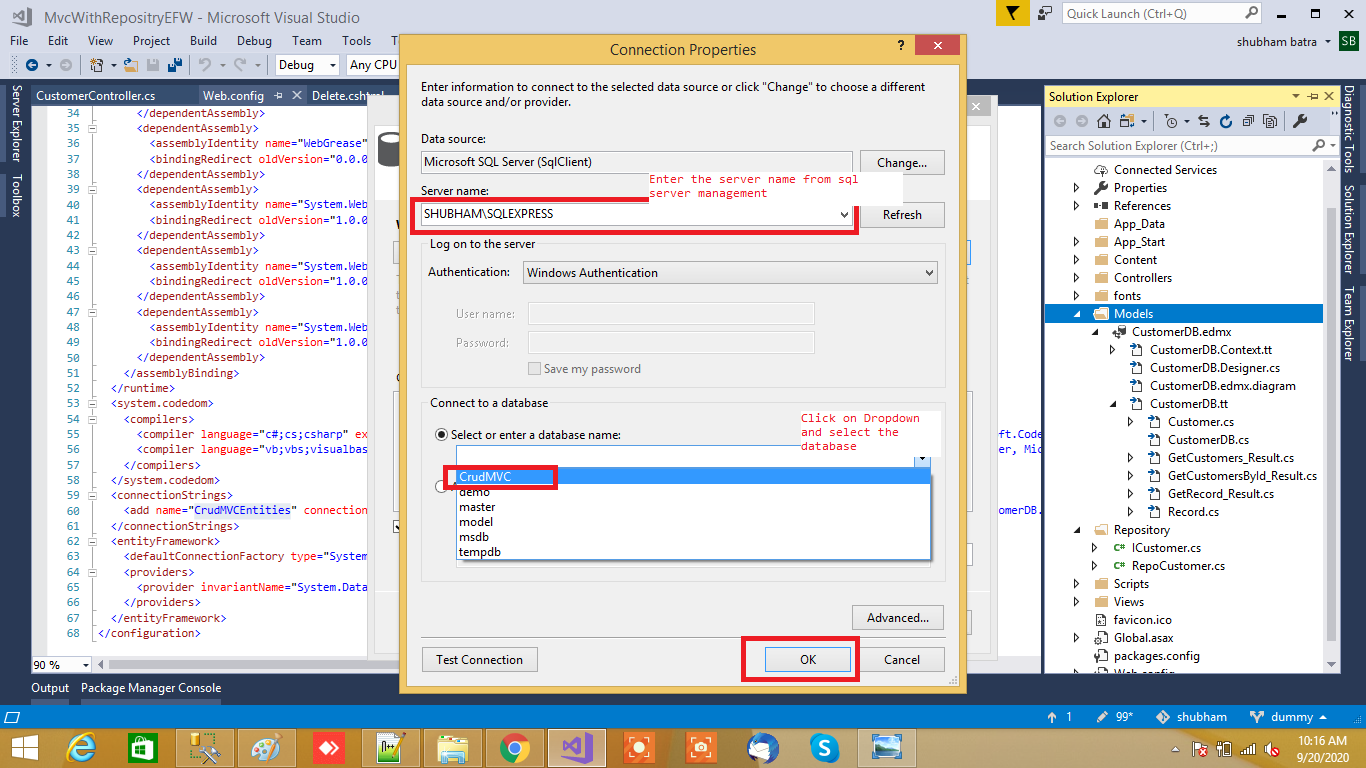
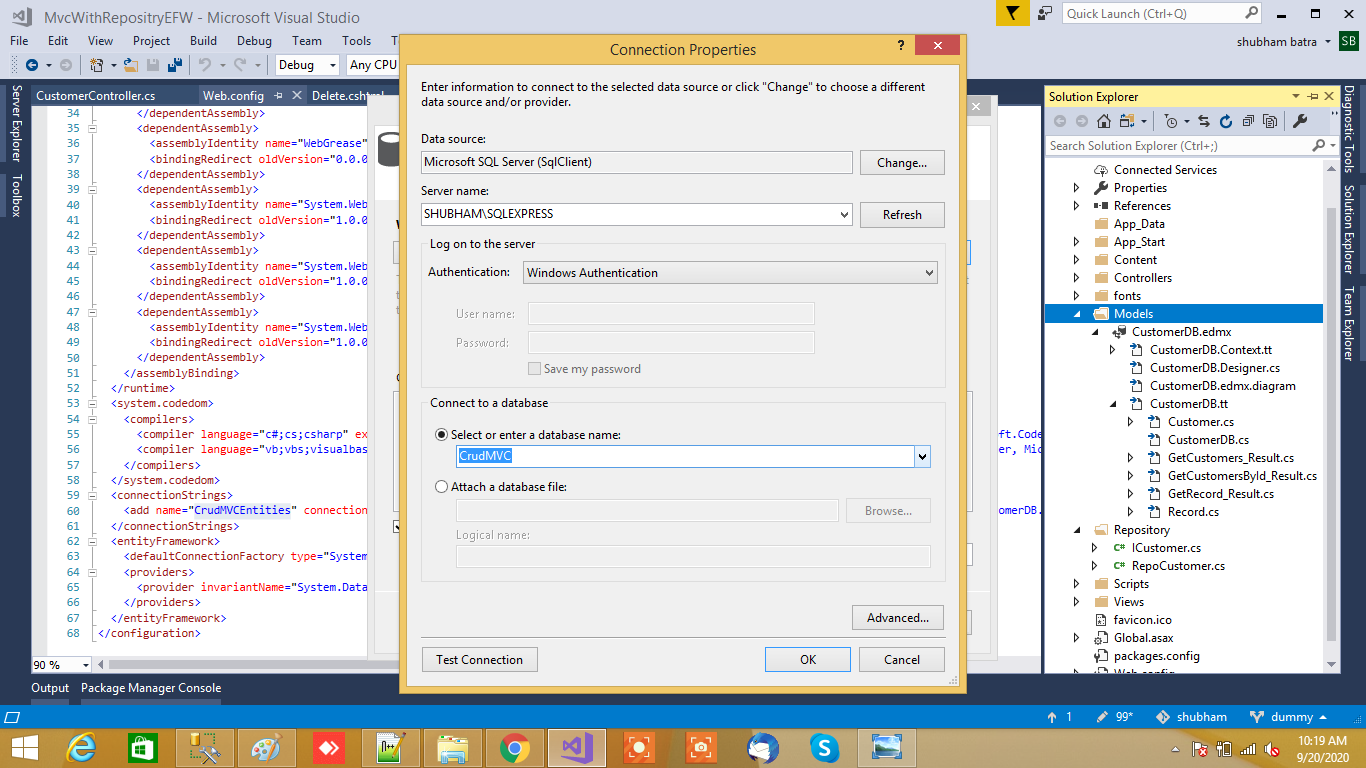
Choosing Database Connection
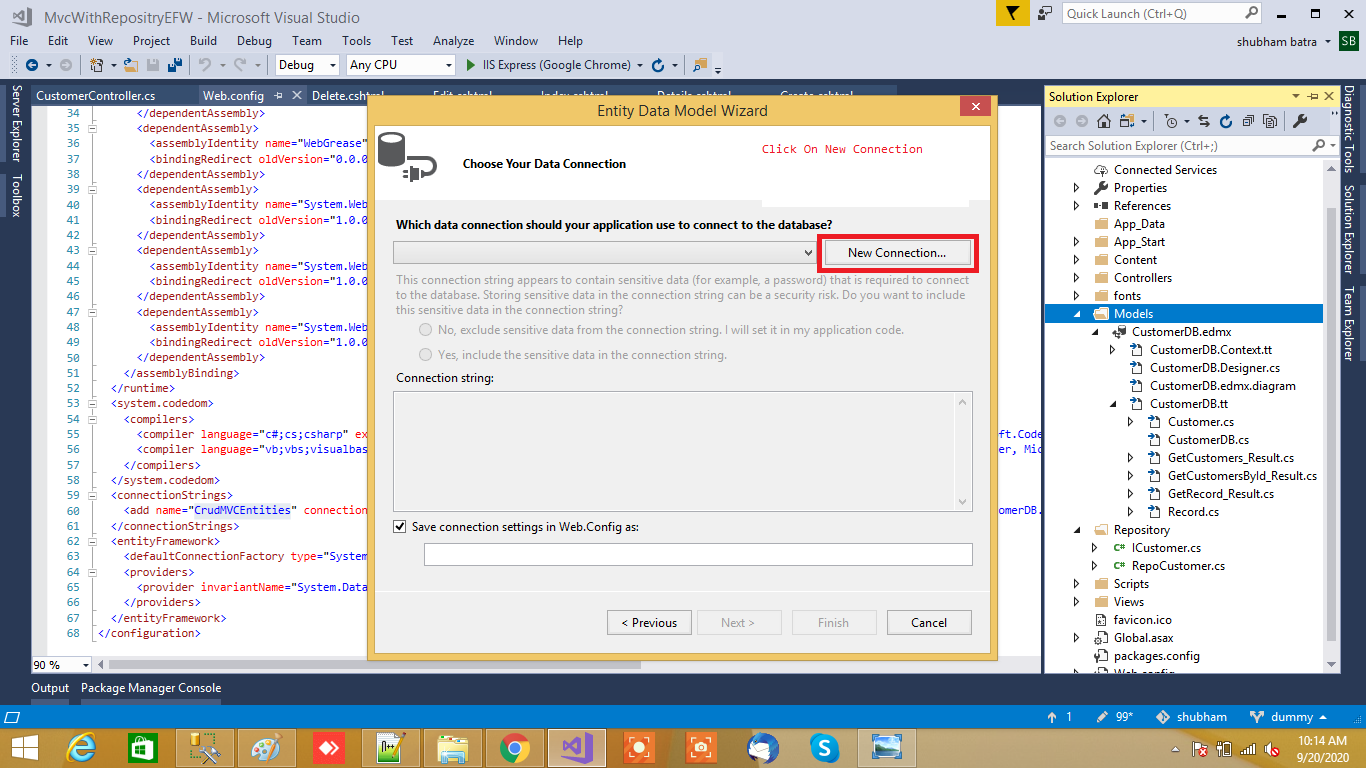
Now click on New Connection a new Dialog will popup. Here we need to configure it. In Server name you need to add your Sql Server Name and select either Using Windows Authentication or Using Sql Server Authentication to connect SQL Server. Here we selected Using Sql Server Authentication and entered User name and Password of Sql server. Last we are going to select Database Name EmployeeDB once we done click on OK button as shown below
After adding database connection our Entity Data Model Wizard will look like below snapshot
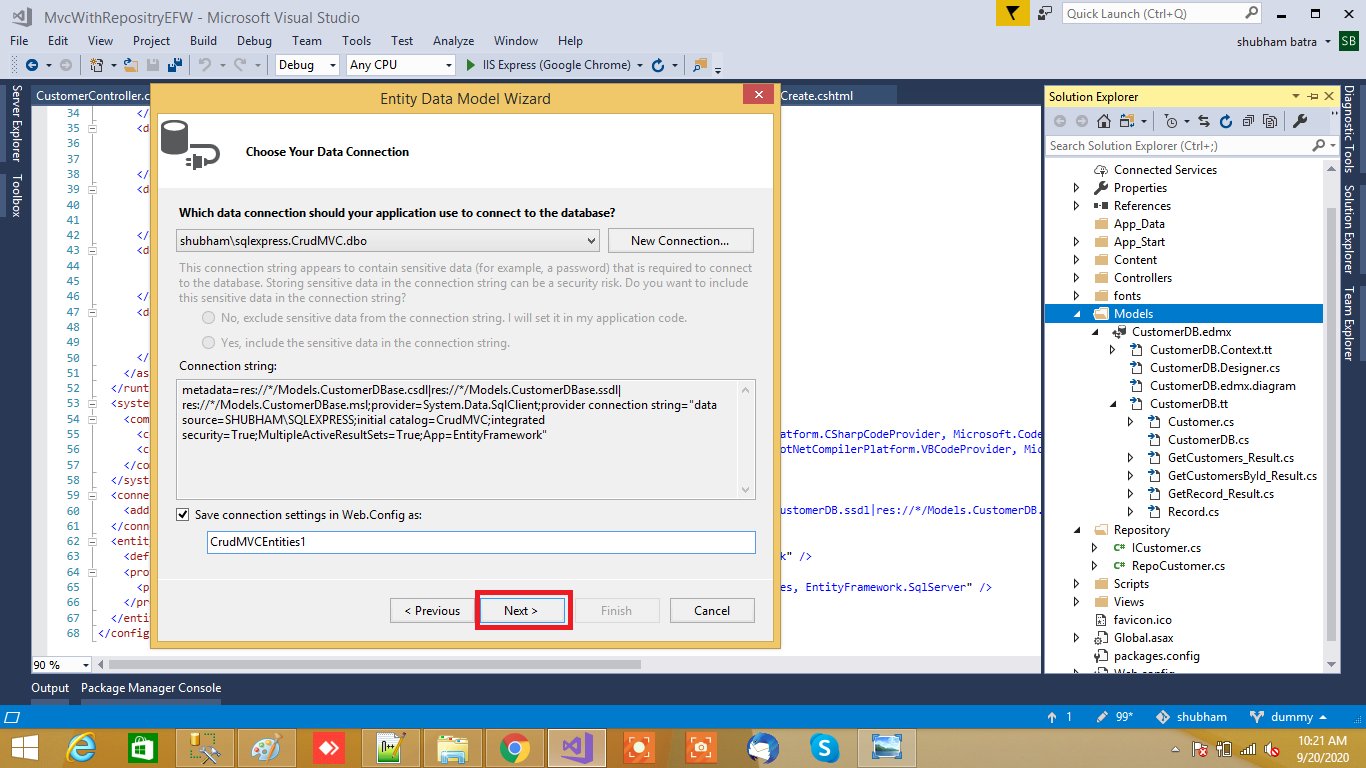
Now click on Next button. A new wizard will pop up for selecting database object and in this you will see all the table which we have created in database
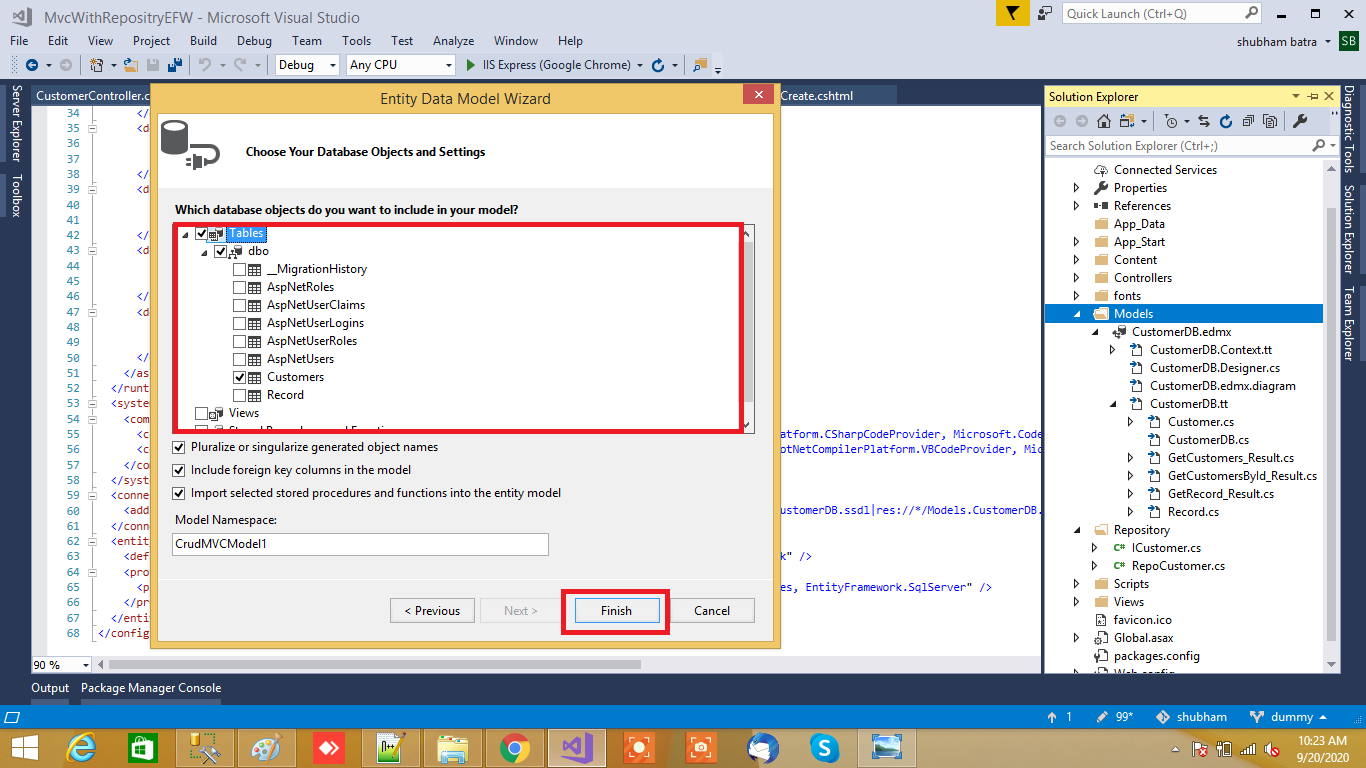
Final clicking on Finish button. After adding ADO.NET Entity Data Model
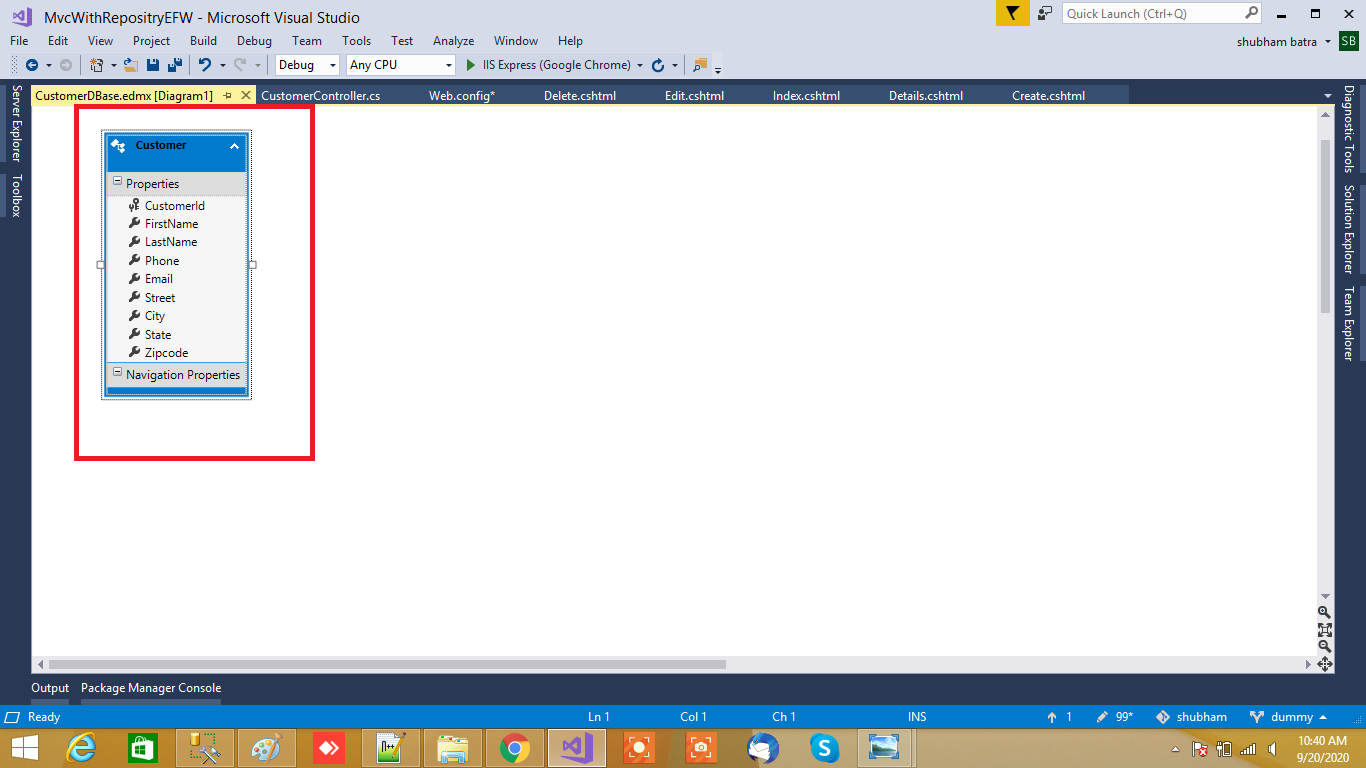
following connection string is generated after adding entity framework
<connectionStrings>
<add name="CrudMVCEntities" connectionString="metadata=res://*/Models.CustomerDB.csdl|res://*/Models.CustomerDB.ssdl|res://*/Models.CustomerDB.msl;provider=System.Data.SqlClient;provider connection string="data source=SHUBHAM\SQLEXPRESS;initial catalog=CrudMVC;integrated security=True;MultipleActiveResultSets=True;App=EntityFramework"" providerName="System.Data.EntityClient" /><add name="CrudMVCEntities1" connectionString="metadata=res://*/Models.CustomerDBase.csdl|res://*/Models.CustomerDBase.ssdl|res://*/Models.CustomerDBase.msl;provider=System.Data.SqlClient;provider connection string="data source=SHUBHAM\SQLEXPRESS;initial catalog=CrudMVC;integrated security=True;MultipleActiveResultSets=True;App=EntityFramework"" providerName="System.Data.EntityClient" />
</connectionStrings>
After adding entity framework now let’s add controller.
Adding Interfaces And Repository
Step 4: Right-click on the project "Add" folder name Repository then Right-click on the Repository folder select "Add" then "Choose a class" window will appear. From that window, select Visual C# and then see on right side Class will display select class and then give a class name as "RepoCustomer.cs" Then click "Add". and after that again right click on Repository folder "Add" an interface ICustomer.cs .
ICustomer interface
using MvcWithRepositryEFW.Models;
using System;
using System.Collections.Generic;
using System.Linq;
using System.Text;
using System.Threading.Tasks;

namespace MvcWithRepositryEFW.Repository
{
  public  interface ICustomer
    {
        IEnumerable<Customer> GetCustomers();
        Customer GetCustomerById(int? id);
        int InsertCustomer(Customer customer);
        int UpdateCustomer(Customer customer);
        void DeleteCustomer(int? id);
    }
}
RepoCustomer Class
using MvcWithRepositryEFW.Models;
using System;
using System.Collections.Generic;
using System.Data.Entity;
using System.Linq;
using System.Web;

namespace MvcWithRepositryEFW.Repository
{
    public class RepoCustomer : ICustomer
    {
        public readonly  CrudMVCEntities DBcontext;


        public RepoCustomer(CrudMVCEntities crudMVCEntities)
        {
            this.DBcontext = crudMVCEntities;
        }

        public void DeleteCustomer(int? id)
        {
            Customer CustomerEntity = DBcontext.Customers.Find(id);
            DBcontext.Customers.Remove(CustomerEntity);
            DBcontext.SaveChanges();
        }

        public Customer GetCustomerById(int? id)
        {
            return DBcontext.Customers.Find(id);
        }

        public IEnumerable<Customer> GetCustomers()
        {
            return DBcontext.Customers.ToList();
        }

        public int  InsertCustomer(Customer customer)
        {
            int result = -1;

            if (customer != null)
            {
                DBcontext.Customers.Add(customer);
                DBcontext.SaveChanges();
                result = customer.CustomerId;
            }
            return result;
        }

        public int UpdateCustomer(Customer customer)
        {
            int result = -1;
            if (customer != null)
            {
                DBcontext.Entry(customer).State = EntityState.Modified;
                DBcontext.SaveChanges();
                result = customer.CustomerId;
            }
            return result;
        }
    }
}
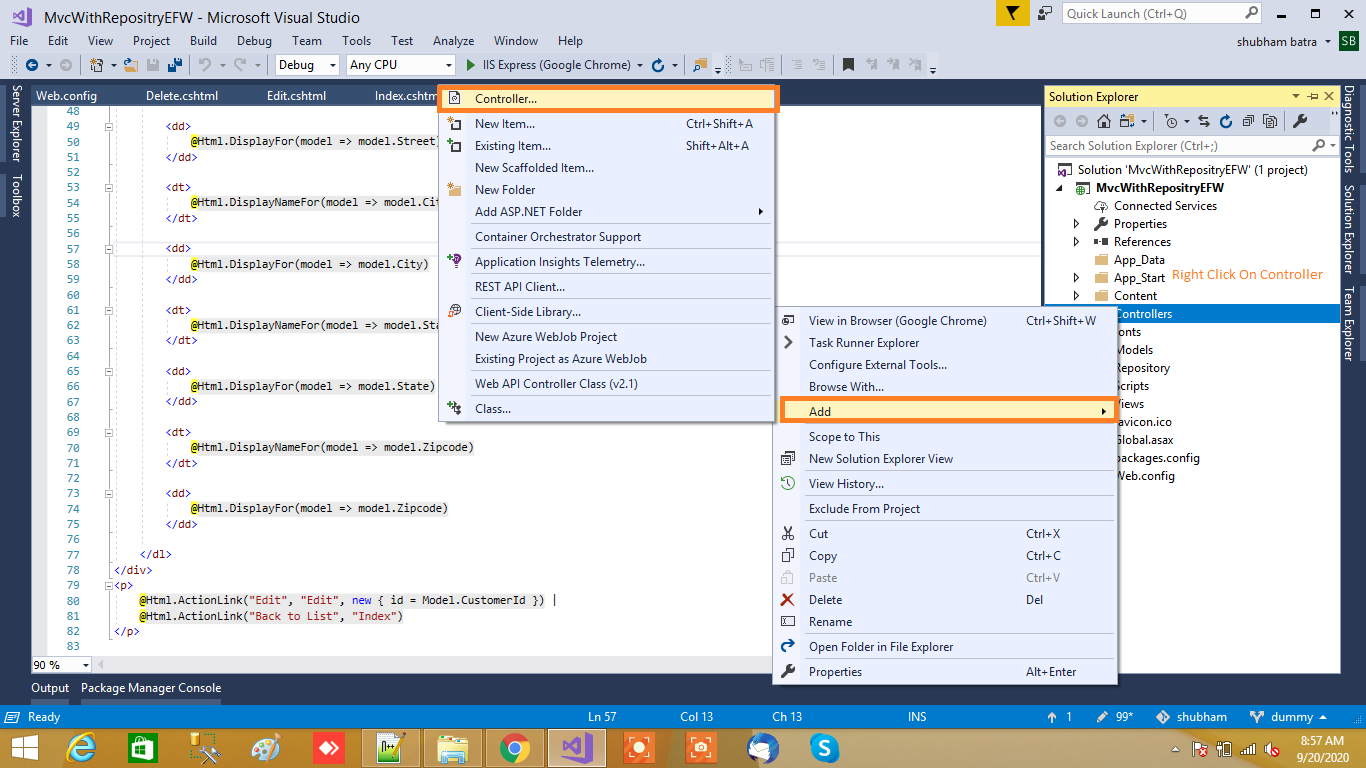
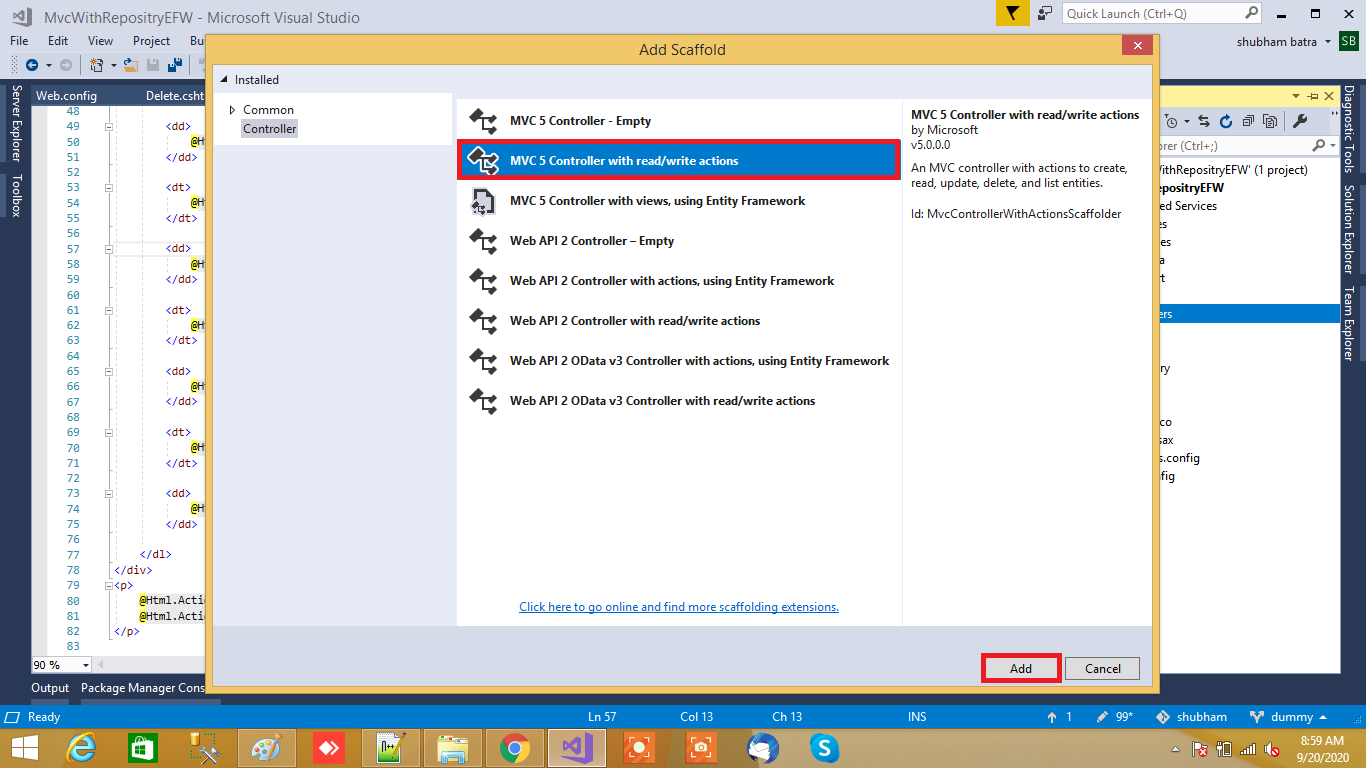
Step 6: Now right click on controllers folder and Add controller A window will appear. Choose MVC5 Controller with read/write actions and click "Add".
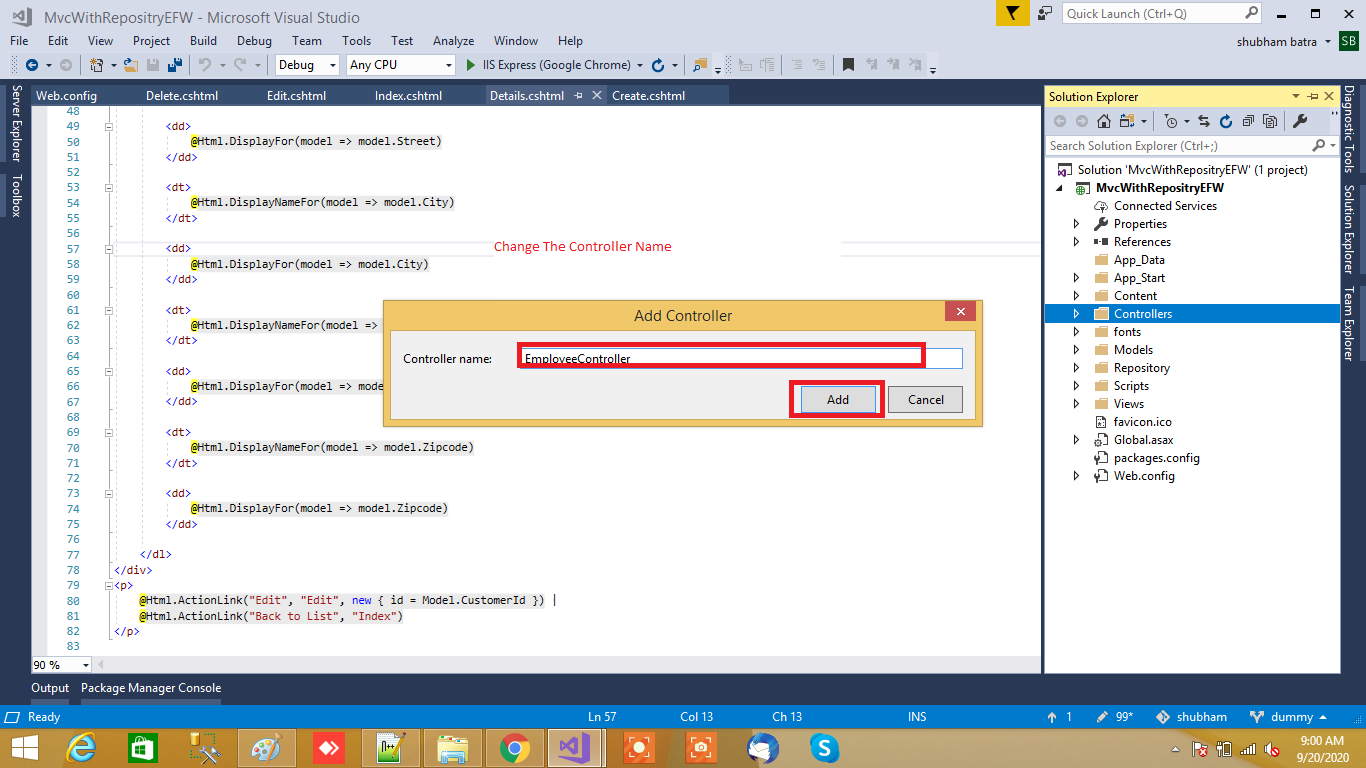
After clicking on "Add", another window will appear with DefaultController. Change the name to CustomerController and click "Add". The CustomerController will be added under the Controllers folder.
using MvcWithRepositryEFW.Models;
using MvcWithRepositryEFW.Repository;
using System;
using System.Collections.Generic;
using System.Linq;
using System.Web;
using System.Web.Mvc;

namespace MvcWithRepositryEFW.Controllers
{
    public class CustomerController : Controller
    {

        private ICustomer _CustomerRepository;

        public CustomerController()
        {
            _CustomerRepository = new RepoCustomer(new Models.CrudMVCEntities());
        }
        public CustomerController(ICustomer CustomerRepository)
        {
            _CustomerRepository = CustomerRepository;
        }
        public ActionResult Index()
        {
            var model = _CustomerRepository.GetCustomers();
            return View(model);
        }

        // GET: Customer/Details/5
        public ActionResult Details(int? id)
        {
            var customerdetail = _CustomerRepository.GetCustomerById(id);
            return View(customerdetail);
        }

        // GET: Customer/Create
        public ActionResult Create()
        {
            return View();
        }

        // POST: Customer/Create
        [HttpPost]
        public ActionResult Create(Customer customer)
        {
            try
            {
                if (ModelState.IsValid)
                {
                    var result = _CustomerRepository.InsertCustomer(customer);
                    return RedirectToAction("Index");
                }
                return View();
            }
            catch (Exception ex)
            {
                string except = ex.Message;
                return View();
            }
        }

        // GET: Customer/Edit/5
        public ActionResult Edit(int id)
        {
            var Customers = _CustomerRepository.GetCustomerById(id);
            return View(Customers);
        }

        // POST: Customer/Edit/5
        [HttpPost]
        public ActionResult Edit(Customer customer)
        {
            try
            {
                if (ModelState.IsValid)
                {
                    int result = _CustomerRepository.UpdateCustomer(customer);
                    if (result > 0)
                    {
                        return RedirectToAction("Index", "Customer");
                    }
                    else
                    {

                        return RedirectToAction("Index", "Customer");
                    }
                }
                return View();
            }
            catch
            {
                return View();
            }
        }

        // GET: Customer/Delete/5
        public ActionResult Delete(int id)
        {
            Customer model = _CustomerRepository.GetCustomerById(id);
            return View(model);
        }

        // POST: Customer/Delete/5

        [HttpPost, ActionName("Delete")]
        public ActionResult ConfirmDelete(int? id)
        {
            try
            {
                _CustomerRepository.DeleteCustomer(id);
                return RedirectToAction("Index", "Customer");
            }
            catch
            {
                return View();
            }
        }
    }
}
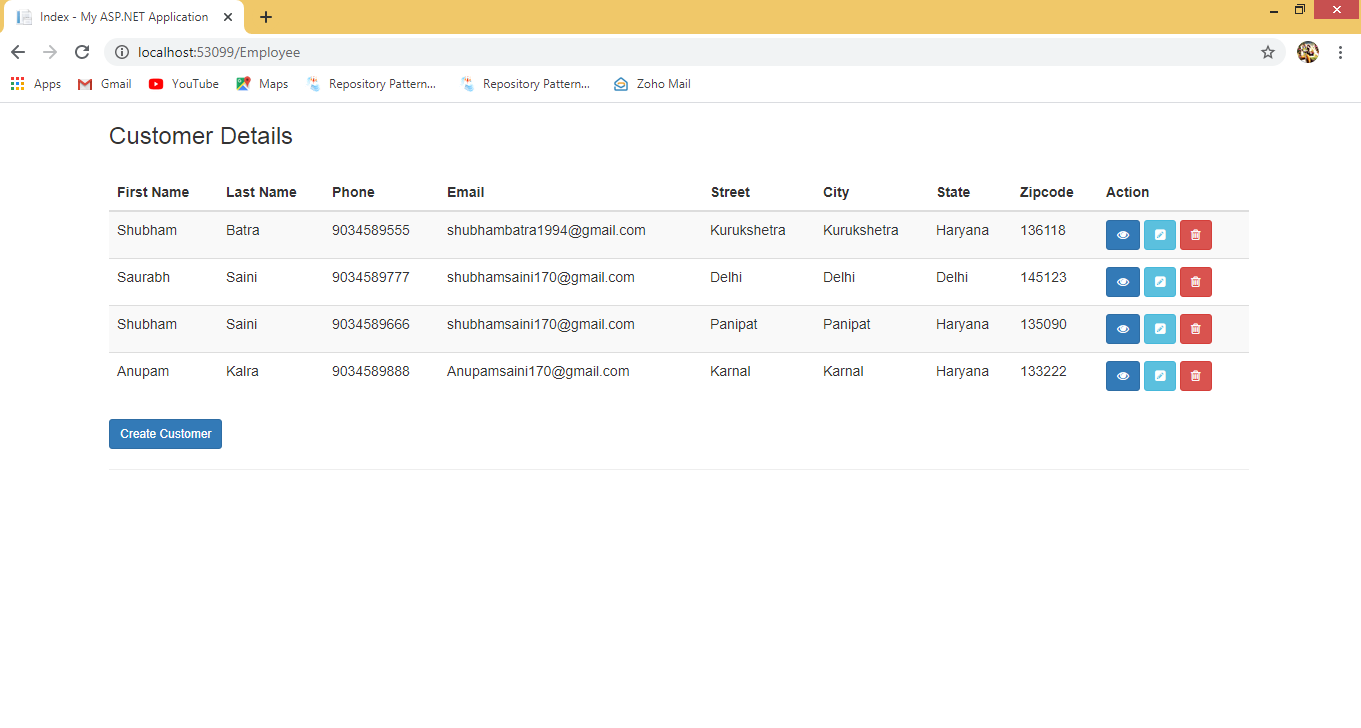
Step 7: Right-click on the Index method in EmployeeController. The "Add View" window will appear with default index name checked (use a Layout page). Click on "Add
Index View
@model List<MvcWithRepositryEFW.Models.Customer>
@{
    ViewBag.Title = "Index";
    var Models = Model ?? new List<MvcWithRepositryEFW.Models.Customer>();
}
<!DOCTYPE html>
<html>
<head>
    <meta name="viewport" content="width=device-width" />
    <title>Details</title>
    <script src="~/Scripts/bootstrap.js"></script>
    <script src="~/Scripts/bootstrap.min.js"></script>
    <link rel="stylesheet" href="https://stackpath.bootstrapcdn.com/font-awesome/4.7.0/css/font-awesome.min.css" integrity="sha384-wvfXpqpZZVQGK6TAh5PVlGOfQNHSoD2xbE+QkPxCAFlNEevoEH3Sl0sibVcOQVnN" crossorigin="anonymous">
</head>
<body>
    <div style="margin-bottom:10px;">
        @Html.ActionLink("Create New", "Create", "Customer", "", new { @class = "btn btn-sm btn-primary rounded-0" })
    </div>
    <h4 class="text-center text-uppercase">List of employees</h4>
    <table id="example" class="table table-bordered">
        <thead>
            <tr>
                <th>@Html.DisplayNameFor(model => model[0].FirstName) </th>
                <th>@Html.DisplayNameFor(model => model[0].LastName) </th>
                <th>@Html.DisplayNameFor(model => model[0].Phone) </th>
                <th>@Html.DisplayNameFor(model => model[0].Email) </th>
                <th>@Html.DisplayNameFor(model => model[0].Street) </th>
                <th>@Html.DisplayNameFor(model => model[0].City) </th>
                <th>@Html.DisplayNameFor(model => model[0].State) </th>
                <th>@Html.DisplayNameFor(model => model[0].Zipcode) </th>
                <th>Action(s)</th>
            </tr>
        </thead>
        @foreach (var item in Models)
        {
            <tr>
                <td>@item.FirstName</td>
                <td>@item.LastName</td>
                <td>@item.Phone</td>
                <td>@item.Email</td>
                <td>@item.Street</td>
                <td>@item.City</td>
                <td>@item.State</td>
                <td>@item.Zipcode</td>
                <td>
                    <a href="@Url.Action("Details","Customer",new { id=item.CustomerId})" class="btn btn-sm btn-primary"><i class="fa fa-eye"></i></a>
                    <a href="@Url.Action("Edit","Customer",new { id=item.CustomerId})" class="btn btn-sm btn-info"><i class="fa fa-pencil-square"></i></a>
                    <a href="@Url.Action("Delete","Customer",new { id=item.CustomerId})" class="btn btn-sm btn-danger"><i class="fa fa-trash-o"></i></a>
                </td>
            </tr>
        }
    </table>
</body>
</html>
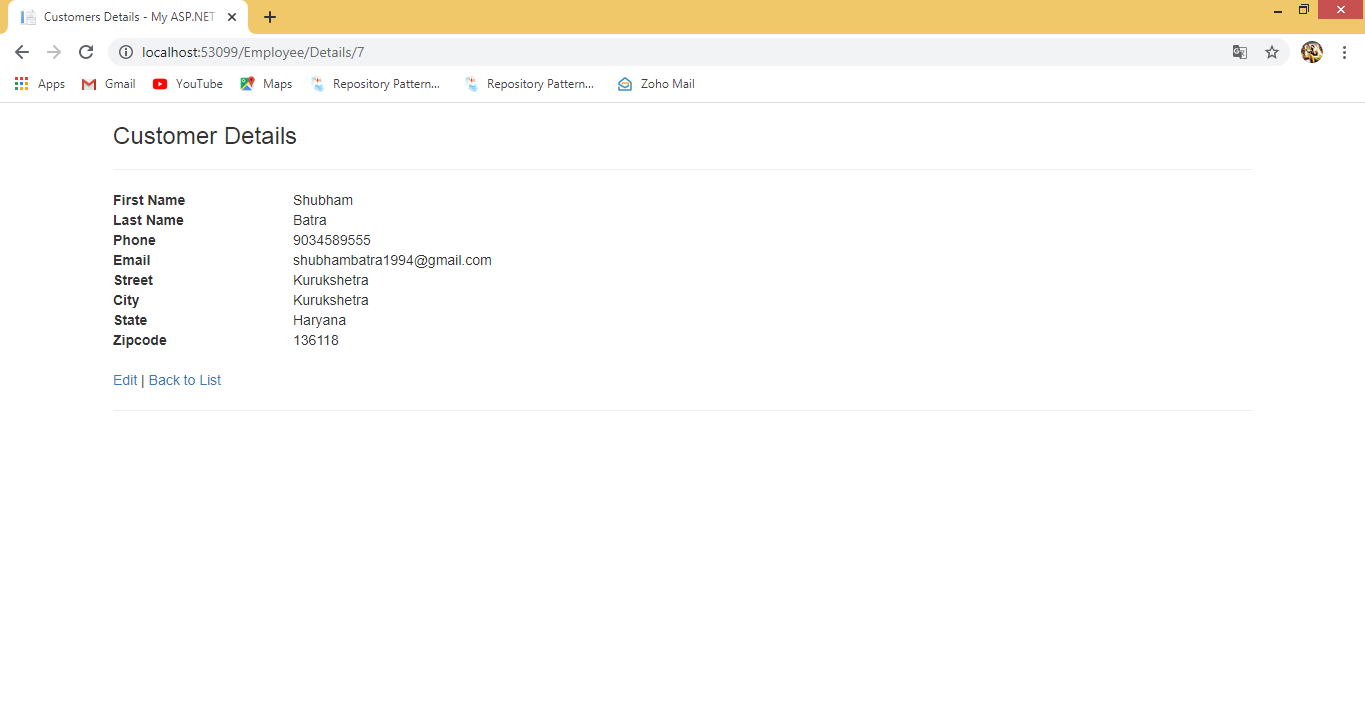
Step 8: Now similarly right click on Details of ActionResult choose "Add View" and click on it. Now you will get another window which has default view name as ActionResult name. Checked Use a lay page and click on "Add".
Details View
@model MvcWithRepositryEFW.Models.Customer

@{
    ViewBag.Title = "Details";
}

<h2>Details</h2>

<div>
    <h4>Customer</h4>
    <hr />
    <dl class="dl-horizontal">
        <dt>
            @Html.DisplayNameFor(model => model.FirstName)
        </dt>

        <dd>
            @Html.DisplayFor(model => model.FirstName)
        </dd>

        <dt>
            @Html.DisplayNameFor(model => model.LastName)
        </dt>

        <dd>
            @Html.DisplayFor(model => model.LastName)
        </dd>

        <dt>
            @Html.DisplayNameFor(model => model.Phone)
        </dt>

        <dd>
            @Html.DisplayFor(model => model.Phone)
        </dd>

        <dt>
            @Html.DisplayNameFor(model => model.Email)
        </dt>

        <dd>
            @Html.DisplayFor(model => model.Email)
        </dd>

        <dt>
            @Html.DisplayNameFor(model => model.Street)
        </dt>

        <dd>
            @Html.DisplayFor(model => model.Street)
        </dd>

        <dt>
            @Html.DisplayNameFor(model => model.City)
        </dt>

        <dd>
            @Html.DisplayFor(model => model.City)
        </dd>

        <dt>
            @Html.DisplayNameFor(model => model.State)
        </dt>

        <dd>
            @Html.DisplayFor(model => model.State)
        </dd>

        <dt>
            @Html.DisplayNameFor(model => model.Zipcode)
        </dt>

        <dd>
            @Html.DisplayFor(model => model.Zipcode)
        </dd>

    </dl>
</div>
<p>
    @Html.ActionLink("Edit", "Edit", new { id = Model.CustomerId }) |
    @Html.ActionLink("Back to List", "Index")
</p>
Step 9: Now click on Create of ActionResult choose "Add View" and click on it. Now you will get another window that has a default view name as ActionResult name. Checked Use a layout page and click on "Add".
Create View
@model MvcWithRepositryEFW.Models.Customer

@{
    ViewBag.Title = "Create";
}

<h2>Create</h2>


@using (Html.BeginForm())
{
    @Html.AntiForgeryToken()

    <div class="form-horizontal">
        <h4>Customer</h4>
        <hr />
        @Html.ValidationSummary(true, "", new { @class = "text-danger" })
        <div class="form-group">
            @Html.LabelFor(model => model.FirstName, htmlAttributes: new { @class = "control-label col-md-2" })
            <div class="col-md-10">
                @Html.EditorFor(model => model.FirstName, new { htmlAttributes = new { @class = "form-control" } })
                @Html.ValidationMessageFor(model => model.FirstName, "", new { @class = "text-danger" })
            </div>
        </div>

        <div class="form-group">
            @Html.LabelFor(model => model.LastName, htmlAttributes: new { @class = "control-label col-md-2" })
            <div class="col-md-10">
                @Html.EditorFor(model => model.LastName, new { htmlAttributes = new { @class = "form-control" } })
                @Html.ValidationMessageFor(model => model.LastName, "", new { @class = "text-danger" })
            </div>
        </div>

        <div class="form-group">
            @Html.LabelFor(model => model.Phone, htmlAttributes: new { @class = "control-label col-md-2" })
            <div class="col-md-10">
                @Html.EditorFor(model => model.Phone, new { htmlAttributes = new { @class = "form-control" } })
                @Html.ValidationMessageFor(model => model.Phone, "", new { @class = "text-danger" })
            </div>
        </div>

        <div class="form-group">
            @Html.LabelFor(model => model.Email, htmlAttributes: new { @class = "control-label col-md-2" })
            <div class="col-md-10">
                @Html.EditorFor(model => model.Email, new { htmlAttributes = new { @class = "form-control" } })
                @Html.ValidationMessageFor(model => model.Email, "", new { @class = "text-danger" })
            </div>
        </div>

        <div class="form-group">
            @Html.LabelFor(model => model.Street, htmlAttributes: new { @class = "control-label col-md-2" })
            <div class="col-md-10">
                @Html.EditorFor(model => model.Street, new { htmlAttributes = new { @class = "form-control" } })
                @Html.ValidationMessageFor(model => model.Street, "", new { @class = "text-danger" })
            </div>
        </div>

        <div class="form-group">
            @Html.LabelFor(model => model.City, htmlAttributes: new { @class = "control-label col-md-2" })
            <div class="col-md-10">
                @Html.EditorFor(model => model.City, new { htmlAttributes = new { @class = "form-control" } })
                @Html.ValidationMessageFor(model => model.City, "", new { @class = "text-danger" })
            </div>
        </div>

        <div class="form-group">
            @Html.LabelFor(model => model.State, htmlAttributes: new { @class = "control-label col-md-2" })
            <div class="col-md-10">
                @Html.EditorFor(model => model.State, new { htmlAttributes = new { @class = "form-control" } })
                @Html.ValidationMessageFor(model => model.State, "", new { @class = "text-danger" })
            </div>
        </div>

        <div class="form-group">
            @Html.LabelFor(model => model.Zipcode, htmlAttributes: new { @class = "control-label col-md-2" })
            <div class="col-md-10">
                @Html.EditorFor(model => model.Zipcode, new { htmlAttributes = new { @class = "form-control" } })
                @Html.ValidationMessageFor(model => model.Zipcode, "", new { @class = "text-danger" })
            </div>
        </div>

        <div class="form-group">
            <div class="col-md-offset-2 col-md-10">
                <input type="submit" value="Create" class="btn btn-default" />
            </div>
        </div>
    </div>
}

<div>
    @Html.ActionLink("Back to List", "Index")
</div>

@section Scripts {
    @Scripts.Render("~/bundles/jqueryval")
}

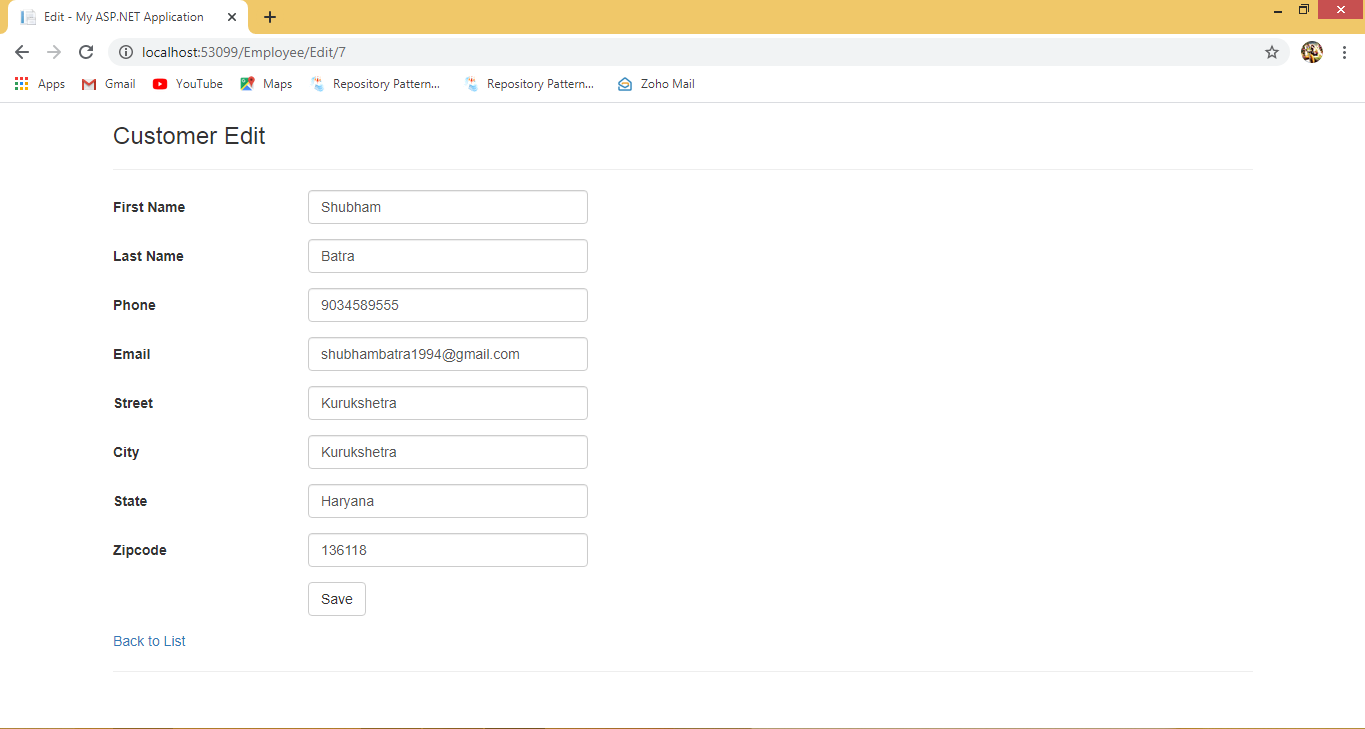
Step 10: Right click on Edit of ActionResult choose “Add View” and click on it. Now you will get another window which has default view name as ActionResult name. Checked Use a layout page and click on “Add”.
Edit View
@model MvcWithRepositryEFW.Models.Customer

@{
    ViewBag.Title = "Edit";
}

<h2>Edit</h2>

@using (Html.BeginForm())
{
    @Html.AntiForgeryToken()

    <div class="form-horizontal">
        <h4>Customer</h4>
        <hr />
        @Html.ValidationSummary(true, "", new { @class = "text-danger" })
        @Html.HiddenFor(model => model.CustomerId)

        <div class="form-group">
            @Html.LabelFor(model => model.FirstName, htmlAttributes: new { @class = "control-label col-md-2" })
            <div class="col-md-10">
                @Html.EditorFor(model => model.FirstName, new { htmlAttributes = new { @class = "form-control" } })
                @Html.ValidationMessageFor(model => model.FirstName, "", new { @class = "text-danger" })
            </div>
        </div>

        <div class="form-group">
            @Html.LabelFor(model => model.LastName, htmlAttributes: new { @class = "control-label col-md-2" })
            <div class="col-md-10">
                @Html.EditorFor(model => model.LastName, new { htmlAttributes = new { @class = "form-control" } })
                @Html.ValidationMessageFor(model => model.LastName, "", new { @class = "text-danger" })
            </div>
        </div>

        <div class="form-group">
            @Html.LabelFor(model => model.Phone, htmlAttributes: new { @class = "control-label col-md-2" })
            <div class="col-md-10">
                @Html.EditorFor(model => model.Phone, new { htmlAttributes = new { @class = "form-control" } })
                @Html.ValidationMessageFor(model => model.Phone, "", new { @class = "text-danger" })
            </div>
        </div>

        <div class="form-group">
            @Html.LabelFor(model => model.Email, htmlAttributes: new { @class = "control-label col-md-2" })
            <div class="col-md-10">
                @Html.EditorFor(model => model.Email, new { htmlAttributes = new { @class = "form-control" } })
                @Html.ValidationMessageFor(model => model.Email, "", new { @class = "text-danger" })
            </div>
        </div>

        <div class="form-group">
            @Html.LabelFor(model => model.Street, htmlAttributes: new { @class = "control-label col-md-2" })
            <div class="col-md-10">
                @Html.EditorFor(model => model.Street, new { htmlAttributes = new { @class = "form-control" } })
                @Html.ValidationMessageFor(model => model.Street, "", new { @class = "text-danger" })
            </div>
        </div>

        <div class="form-group">
            @Html.LabelFor(model => model.City, htmlAttributes: new { @class = "control-label col-md-2" })
            <div class="col-md-10">
                @Html.EditorFor(model => model.City, new { htmlAttributes = new { @class = "form-control" } })
                @Html.ValidationMessageFor(model => model.City, "", new { @class = "text-danger" })
            </div>
        </div>

        <div class="form-group">
            @Html.LabelFor(model => model.State, htmlAttributes: new { @class = "control-label col-md-2" })
            <div class="col-md-10">
                @Html.EditorFor(model => model.State, new { htmlAttributes = new { @class = "form-control" } })
                @Html.ValidationMessageFor(model => model.State, "", new { @class = "text-danger" })
            </div>
        </div>

        <div class="form-group">
            @Html.LabelFor(model => model.Zipcode, htmlAttributes: new { @class = "control-label col-md-2" })
            <div class="col-md-10">
                @Html.EditorFor(model => model.Zipcode, new { htmlAttributes = new { @class = "form-control" } })
                @Html.ValidationMessageFor(model => model.Zipcode, "", new { @class = "text-danger" })
            </div>
        </div>

        <div class="form-group">
            <div class="col-md-offset-2 col-md-10">
                <input type="submit" value="Save" class="btn btn-default" />
            </div>
        </div>
    </div>
}

<div>
    @Html.ActionLink("Back to List", "Index")
</div>

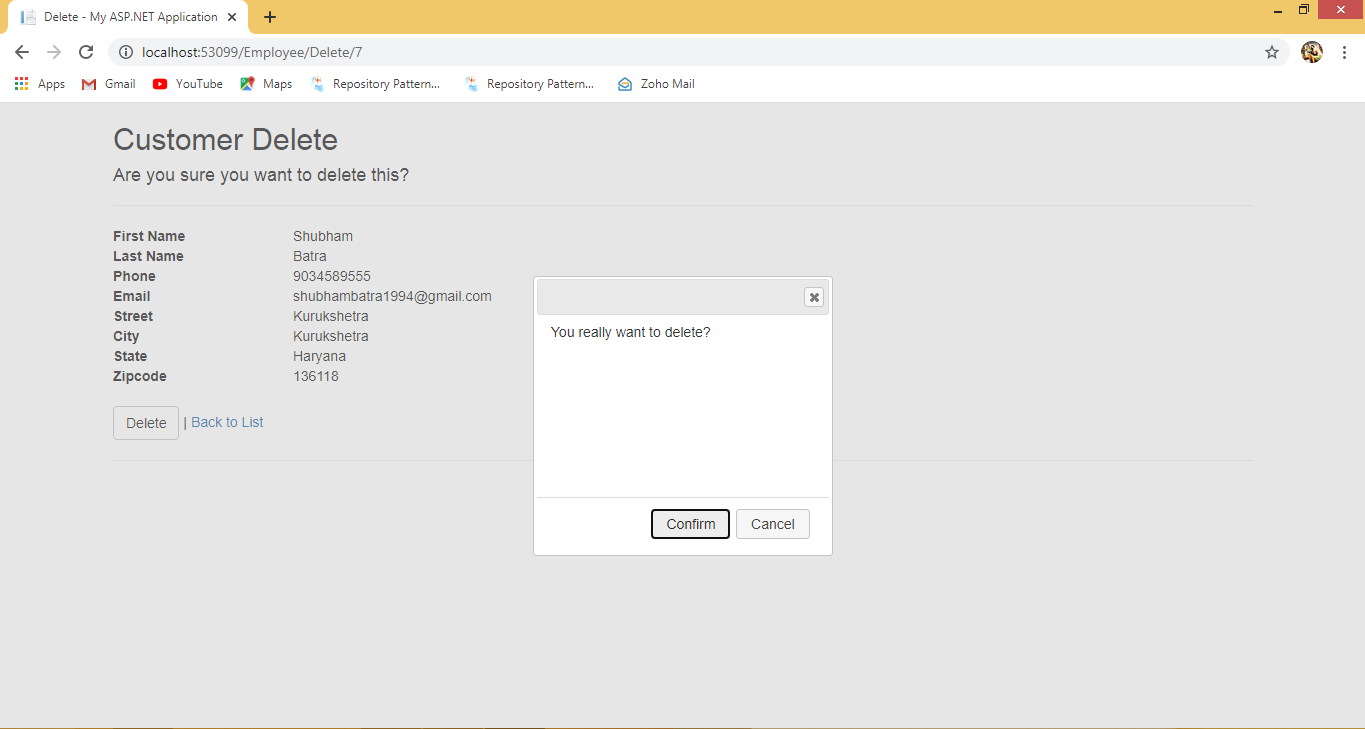
Step 11: Right click on Delete of ActionResult choose “Add View” and click on it. Now you will get another window which has default view name as ActionResult name. Checked Use a lay page and click on “Add”.
Delete View
@model MvcWithRepositryEFW.Models.Customer

@{
    ViewBag.Title = "Delete";
}

<h2>Delete</h2>

<h3>Are you sure you want to delete this?</h3>
<div>
    <h4>Customer</h4>
    <hr />
    <dl class="dl-horizontal">
        <dt>
            @Html.DisplayNameFor(model => model.FirstName)
        </dt>

        <dd>
            @Html.DisplayFor(model => model.FirstName)
        </dd>

        <dt>
            @Html.DisplayNameFor(model => model.LastName)
        </dt>

        <dd>
            @Html.DisplayFor(model => model.LastName)
        </dd>

        <dt>
            @Html.DisplayNameFor(model => model.Phone)
        </dt>

        <dd>
            @Html.DisplayFor(model => model.Phone)
        </dd>

        <dt>
            @Html.DisplayNameFor(model => model.Email)
        </dt>

        <dd>
            @Html.DisplayFor(model => model.Email)
        </dd>

        <dt>
            @Html.DisplayNameFor(model => model.Street)
        </dt>

        <dd>
            @Html.DisplayFor(model => model.Street)
        </dd>

        <dt>
            @Html.DisplayNameFor(model => model.City)
        </dt>

        <dd>
            @Html.DisplayFor(model => model.City)
        </dd>

        <dt>
            @Html.DisplayNameFor(model => model.State)
        </dt>

        <dd>
            @Html.DisplayFor(model => model.State)
        </dd>

        <dt>
            @Html.DisplayNameFor(model => model.Zipcode)
        </dt>

        <dd>
            @Html.DisplayFor(model => model.Zipcode)
        </dd>

    </dl>

    @using (Html.BeginForm("Delete", "Customer", FormMethod.Post, new { id = "DeleteCustomer", enctype = "multipart/form-data", name = "Delete" }))
    {

        @Html.AntiForgeryToken()

        <div class="form-actions no-color">
            <input type="submit" value="Delete" id="Delete" formmethod="post" name="command" class="btn btn-default" /> |
            @Html.ActionLink("Back to List", "Index")
        </div>
    }
    <div id="DeleteDialog">You really want to delete?</div>

    @section scripts{
        <link rel="stylesheet" href="https://code.jquery.com/ui/1.12.1/themes/base/jquery-ui.css">
        <script src="https://code.jquery.com/jquery-1.12.4.js"></script>
        <script src="https://code.jquery.com/ui/1.12.1/jquery-ui.js"></script>
        <script>
            $(document).ready(function () {
                debugger;
                $("#DeleteDialog").dialog({
                    height: 280,
                    modal: true,
                    autoOpen: false,
                    buttons: {
                        'Confirm': function () {
                            $("#DeleteCustomer").submit();
                            $(this).dialog('close');
                        },
                        'Cancel': function () {
                            $(this).dialog('close');
                        }
                    }
                });

                $("#DeleteDialog").hide();
                $("#Delete").click(function (e) {
                    debugger;
                    $("#DeleteDialog").dialog("open");
                    e.preventDefault();
                    return false;
                });


            });

        </script>
}
    </div>