Hello, guys! Welcome to Code2Night, your go-to destination for all things coding and software development. In this article, we're going to dive into the exciting world of Microsoft Outlook appointment management using ASP.NET MVC. Specifically, we'll explore two methods to add and retrieve appointments: Microsoft.Interop library and the Microsoft Exchange service.
Scheduling and managing appointments is a critical aspect of many applications, and Microsoft Outlook provides robust features for this purpose. By leveraging the power of Outlook, we can seamlessly integrate appointment functionality into our ASP.NET MVC applications, enhancing their usability and productivity.
Now, you might be wondering why we need two different approaches to achieve the same goal. Well, each method offers distinct advantages and caters to different scenarios. The Microsoft.Interop library provides direct access to Outlook's COM API, allowing fine-grained control over the appointment management process. On the other hand, the Microsoft Exchange service provides a higher-level abstraction, making it easier to work with Outlook appointments in an ASP.NET MVC environment.
Throughout this article, we'll explore both approaches in detail, enabling you to choose the one that best suits your application requirements. We'll start by diving into Microsoft.Interop library, where we'll learn how to add and retrieve appointments directly using the Outlook COM API. We'll explore the necessary steps, code snippets, and best practices to seamlessly integrate this functionality into your ASP.NET MVC projects.
Next, we'll shift our focus to the Microsoft Exchange service, which offers a more streamlined approach to working with Outlook appointments. We'll uncover the power of this service by demonstrating how to add and retrieve appointments using its intuitive and straightforward APIs. With the Microsoft Exchange service, you can bypass the complexities of the underlying COM API and focus on the core functionality you need to build efficient appointment management systems.
By the end of this article, you'll have a solid understanding of both methods and be equipped with the knowledge to incorporate Outlook appointment management seamlessly into your ASP.NET MVC applications. Whether you're a seasoned developer or just starting your coding journey, this guide will provide you with valuable insights and hands-on examples to propel your application development skills.
So, let's embark on this exciting journey together and unlock the immense potential of Outlook in ASP.NET MVC. Get ready to supercharge your appointment management capabilities and take your applications to the next level. Let's dive in!

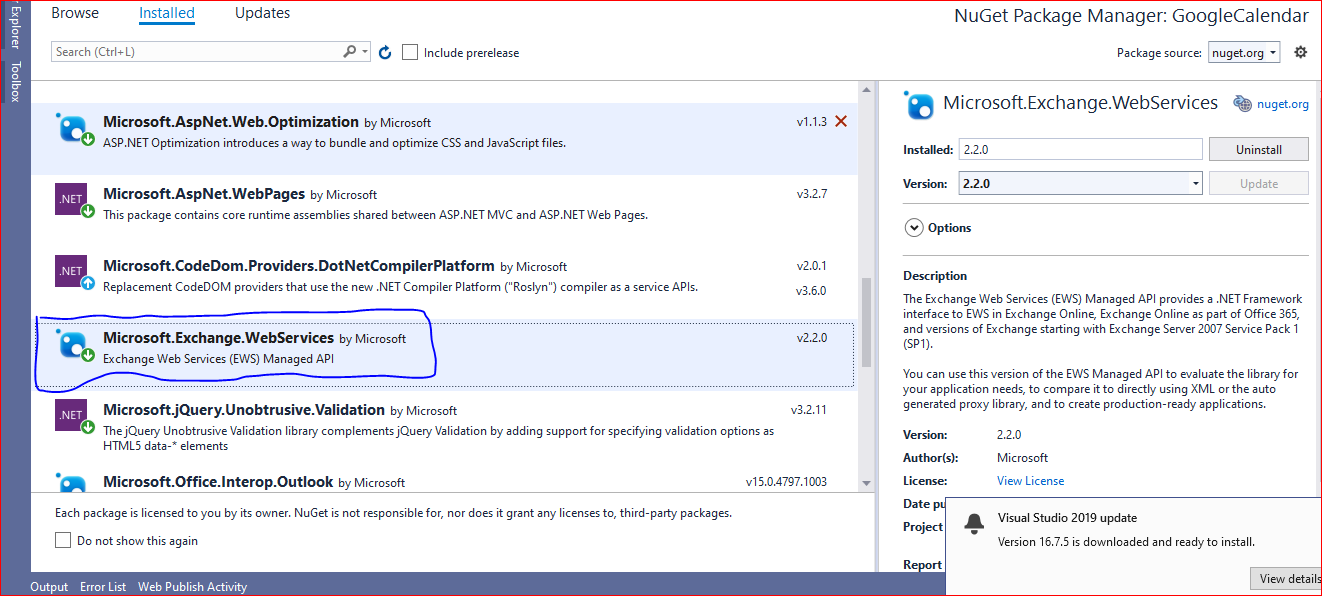
Step-1 First of all add a nugget package for Microsoft Exchange Services which will let you connect to Outlook from within your web application. We will use this to get our Outlook appointments and then for saving appointments also.

Step-2 Add these namespaces to your controller
using Microsoft.Exchange.WebServices.Data;
using CalendarView = Microsoft.Exchange.WebServices.Data.CalendarView;
Step-3 We will use this to get appointments from our Outlook account. You can replace your Outlook username and password and then just run this piece of code.
  public ActionResult GetAppointments()
        {
            string ewsUrl = "https://outlook.office365.com/EWS/Exchange.asmx";
            string userName = "youroutlookmail";
            string password = "youroutlookpassword";

            ExchangeService servicex = new ExchangeService();
            servicex.Url = new Uri(ewsUrl);
            servicex.UseDefaultCredentials = true;
            servicex.Credentials = new WebCredentials(userName, password);
            DateTime startDate = DateTime.Now;
            DateTime endDate = startDate.AddDays(30);
            const int NUM_APPTS = 5;
            // Initialize the calendar folder object with only the folder ID.
            CalendarFolder calendar = CalendarFolder.Bind(servicex, WellKnownFolderName.Calendar, new PropertySet());
            // Set the start and end time and number of appointments to retrieve.
            CalendarView cView = new CalendarView(startDate, endDate, NUM_APPTS);
            // Limit the properties returned to the appointment's subject, start time, and end time.
            cView.PropertySet = new PropertySet(AppointmentSchema.Subject, AppointmentSchema.Start, AppointmentSchema.End);
            // Retrieve a collection of appointments by using the calendar view.
            FindItemsResults<Appointment> appointments = calendar.FindAppointments(cView);
            Debug.WriteLine("\nThe first " + NUM_APPTS + " appointments on your calendar from " + startDate.Date.ToShortDateString() +
                              " to " + endDate.Date.ToShortDateString() + " are: \n");

            foreach (Appointment a in appointments)
            {
                /*Here you will get your appointments*/
                Debug.Write("Subject: " + a.Subject.ToString() + " ");
                Debug.Write("Start: " + a.Start.ToString() + " ");
                Debug.Write("End: " + a.End.ToString());
                clsAppointment app = new clsAppointment();
                app.Subject = a.Subject.ToString();
                app.StartDate = a.Start;
                app.EndDate = a.End;


            }
            return View();
        }
Step-4 After getting appointments now in this step we will see how to add new appointments. We will use the same exchange service to Add Appointments in our Microsoft Outlook account.
 public ActionResult AddAppointments()
        {
            string ewsUrl = "https://outlook.office365.com/EWS/Exchange.asmx";
            string userName = "yourOutlookEmail";
            string password = "youroutlookpassword";

            ExchangeService servicex = new ExchangeService();
            servicex.Url = new Uri(ewsUrl);
            servicex.UseDefaultCredentials = true;
            servicex.Credentials = new WebCredentials(userName, password);


                Appointment appointment = new Appointment(servicex);
                // Set the properties on the appointment object to create the appointment.
                appointment.Subject = "Tennis lesson";
                appointment.Body = "Focus on backhand this week.";
                appointment.Start = DateTime.Now.AddDays(2);
                appointment.End = appointment.Start.AddHours(1);
                appointment.Location = "Tennis club";
                appointment.ReminderDueBy = DateTime.Now;


                // Save the appointment to your calendar.
                appointment.Save(SendInvitationsMode.SendToNone);
                return View();
            }
Conclusion- So this is how you can integrate Outlook appointments with your Asp.Net MVC web application


